
Three real jobs, from 3,053 stitches to 103,738. What actually decides the count, when a high one is a warning sign, and what it means for your run time.

People ask this for one of two reasons. Either a digitizer quoted them per 1,000 stitches and the number sounded high, or a job is taking longer on the machine than expected.
The honest answer is that there's no correct stitch count for a design. There's a correct density for the area being covered, and the stitch count is just what falls out of it. But that's not much use on its own, so here are three real jobs with their actual numbers.
A simple outlined number: 3,053 stitches. Four objects, four colors. A run stitch outline at 182, a light fill, and a satin border at 2,428. Most of the count sits in the satin, which is normal, because satin is the expensive stitch.
A club badge: 9,569 stitches. Twelve objects, six colors. The largest single element is a 3,977 stitch fill, and the curved lettering around the outside comes to 1,368. That's a standard left-chest badge with a crest, a ring and text.
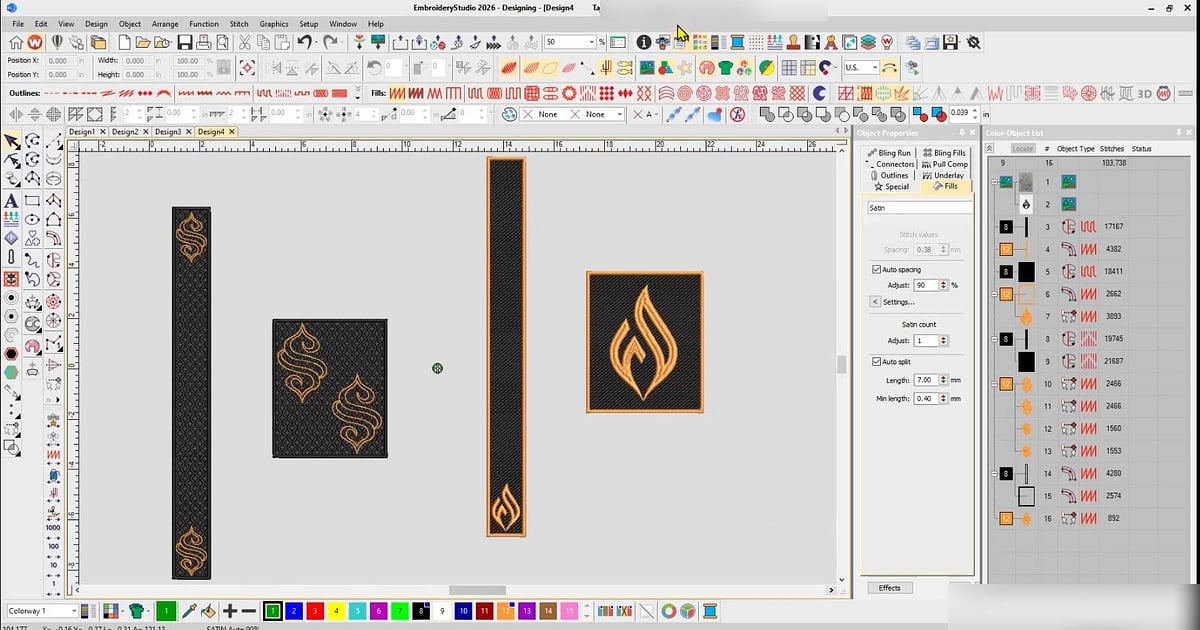
A native wear set: 103,738 stitches. Sixteen objects, nine colors, with individual elements at 21,687, 19,745 and 18,411. This is the placket and panel work on a kaftan, and it's the cover image on this page.
So the range across three ordinary jobs is more than thirty to one. Anyone quoting you a normal stitch count without asking what the design is has not thought about it.
How many stitches you end up with comes down to five things, and only one of them is the design itself:
Color changes are worth a separate mention. They add almost nothing to the stitch count but plenty to the run time, because the machine stops for each one. A nine color design and a three color design of the same size can be minutes apart on the floor.
Worth looking at the breakdown rather than the total, because it tells you where the work is.
In the club badge, one filled element accounts for 3,977 of the 9,569, which is over a third of the design in a single shape. Several other objects are under 200 stitches each. That pattern is normal: a couple of big elements carry most of the count and everything else is detail.
It matters when you're trying to bring a design down. Shaving a few hundred stitches off the small elements achieves almost nothing. Reconsidering the one big fill, its density or its size, is where the saving lives. People usually attack this the wrong way round and wonder why the total barely moves.
Here's where the number becomes useful to you as a buyer.
A big design should have a big count. A small one shouldn't. If a simple two color left-chest logo comes back at thirty thousand stitches, something is wrong: either the density was pushed up, or unnecessary layers were left underneath, or nobody sequenced it and the file is full of wasted travel. That's usually a traced file rather than a built one, which is the difference our post on hand digitizing vs auto digitizing goes through.
The reverse is also a signal. A count that looks suspiciously low on a design that should be solid usually means thin coverage, and you'll see the garment through it once it stitches.
The practical check is simple. Compare like with like. Once you've run a few jobs you'll know roughly what a left-chest logo costs you in stitches, and anything wildly outside that deserves a question before you commit to eighty pieces.
This is the number that actually costs you money.
Machines are advertised at speeds like 1,200 stitches a minute, but in production most people run nearer 700 to 900 depending on the job, and slower again on caps and difficult fabric. Take the middle of that and the arithmetic is easy enough to do in your head: the 9,569 stitch badge is roughly twelve minutes a garment. The 103,738 stitch native wear set is over two hours on a single head.
Now multiply by the order. Eighty badges is around sixteen hours of machine time before you count hooping, thread changes and trimming. That's the difference between quoting a job properly and losing money on it, and it's why stitch count belongs in your pricing rather than just in the digitizer's invoice.
If a design is heavier than it should be, these are the levers, roughly in the order worth trying:
What not to do is thin the density until it stops covering. That trades a stitch count problem for a coverage problem, and coverage problems are the ones clients notice, as our post on why an embroidery design went wrong shows.
Plenty of digitizers charge per 1,000 stitches, which is why people ask how many stitches a design will have before it exists. A good one can estimate within a few thousand for work they've done before.
Ask for that estimate and a cap up front, and remember the estimate is a guess about a file nobody has built yet. Our guide to what embroidery digitizing costs covers both charging models and which suits which job.
Once you're running work regularly, the number worth tracking isn't the stitch count itself. It's your minutes per garment and what those minutes cost you, which is the sort of thing EMBBA is built to keep alongside the order.
Everything above is a consequence of decisions someone made while building the file. When you make those decisions yourself, the stitch count stops being something that arrives and starts being something you choose.
That's a large part of what our Digitizing Mastery course teaches: density, underlay and stitch type as production choices rather than software defaults. Most students are digitizing the basics inside a week.
Most land somewhere in the region of the badge above, several thousand up to around fifteen thousand depending on how much of it is filled. A simple one-color mark can be far less.
No, and often the opposite. Quality is coverage that suits the fabric, not thread piled up. A design can be heavy and still show the garment through it if the underlay was wrong.
Your machine shows it when the design loads, and any stitch file viewer will tell you. Digitizing software shows it per element, which is how the numbers in this post were read.
Trims and color changes are commands rather than stitches, so they don't add to the total, but they do add to the run time. A file with far more trims than it needs will take longer than its stitch count suggests, which is a sequencing problem rather than a density one.
If it was resized properly, from the source file, the software regenerated the stitches for the new area, which is correct. If the count didn't change at all, the file was scaled rather than rebuilt and the density is now wrong. That distinction is in our guide to embroidery file formats.
There's no target number. There's a sensible density for the area, and the count follows. Three real jobs came to 3,053, 9,569 and 103,738 stitches, so judge a count against designs like it rather than against a rule. Then convert it to minutes, because that's what it actually costs you.
The Academy turns articles like this into proper courses, with video lessons, assessments, and people to learn alongside.