
Every color costs you a stop, a trim and a needle, but almost no stitches. Here's what color count really costs, and how to bring it down without hurting the design.

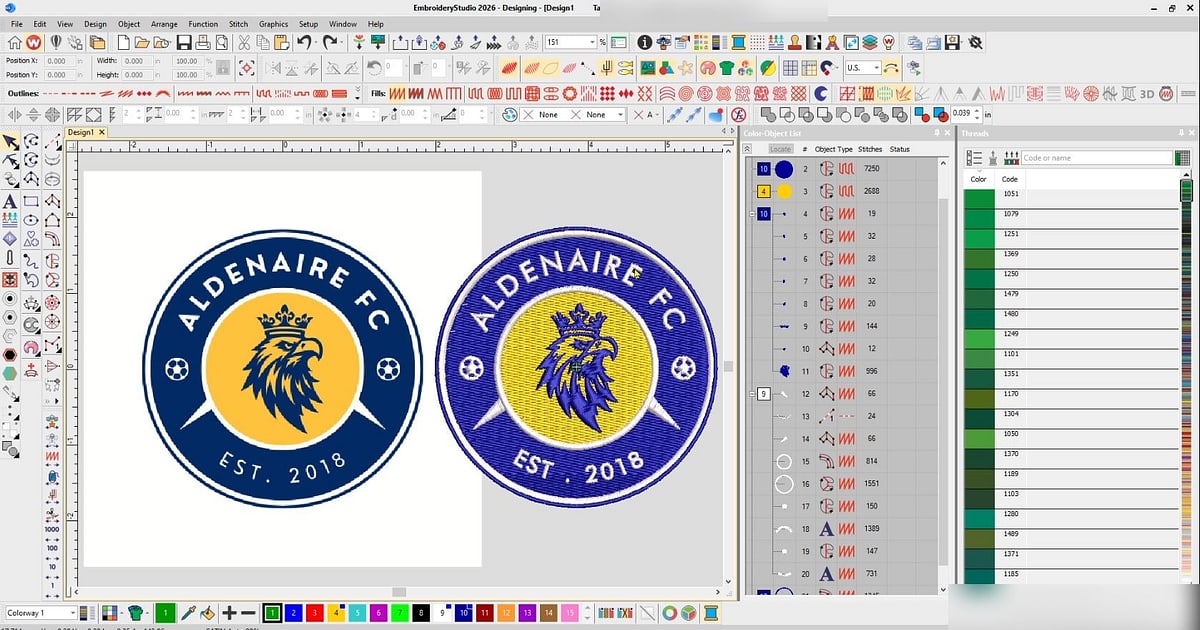
Look at the cover image. Brand artwork on the left, the digitized version beside it, and the thread palette open on the right.
Two things are going on there. The colors are close but not identical, which is a matching question and one our post on digitizing a logo deals with properly. The other question is the one nobody asks until the machine is running: how many colors should there be at all?
Almost no stitches, and quite a lot of time.
Adding a color doesn't add meaningful stitch count. What it adds is a stop, a trim, a jump to wherever that color appears, and on a single needle machine, a rethread. On a multi-needle it's a color change and a moment of lost speed, every single garment, forever.
That's the useful way to think about it. Stitch count tells you how long the machine spends sewing. Color count tells you how often it stops. A nine color design and a four color design of similar size can be minutes apart per piece, which across a hundred garments is most of a working day.
Worth clearing up because people confuse them constantly.
The badge on the cover has over twenty separate objects in its list, several of them tiny: nineteen stitches here, thirty-two there, twelve somewhere else. Those are details, not colors. Many of them share the same thread, so they cost the machine nothing extra as long as they're grouped together.
A design can have forty objects and five colors, or five objects and five colors. It's the colors that cost you time on the floor.
This is where it becomes practical.
Most commercial machines carry 12 or 15 needles. If a design uses fewer colors than you have needles, everything can be loaded before the run starts and the machine works through without you. Go over, and someone has to stand there and rethread partway through every garment.
So the number that matters isn't a general rule, it's your machine. On twelve needles, a design at eight or nine colors leaves room for the regulars to stay loaded. A design at fourteen means rethreading between jobs constantly. Our guide to choosing the right embroidery machine makes the same point from the buying side.
Usually possible without anyone noticing, if you do it thoughtfully.
What not to do is drop a color that carries meaning. Club colors, brand colors and anything a client would notice missing are not efficiency savings, they're the job.
There's an order to this worth following. Look at what the artwork needs first, then at what thread can actually distinguish, then at what your machine can carry without a rethread. Cutting in that order means every color you lose was one nobody would have seen anyway. Cutting in the reverse order, starting from the needle count and working back, is how club badges end up in the wrong shade of blue.
Worth doing once with a stopwatch, because the answer surprises people and it changes how you quote.
Time a color change on your own machine, from the moment the last stitch of one color finishes to the first stitch of the next. Include the trim and the move. Whatever that number is, multiply it by the colors in the design and then by the pieces in the order.
On a run of a hundred garments, a design carrying three colors more than it needs can cost the better part of an hour of machine time that nobody quoted for. That's not an argument for stripping designs back to two colors. It's an argument for knowing the number, so when a client asks for one more shade you can say what it costs instead of guessing.
Given a set of thread colors, the sequence still has to be decided, and it changes both the result and the run time.
Two principles cover most of it. Anything that sits underneath stitches first, so the layers build in the right order. And everything sharing a color is grouped, so the machine visits that thread once rather than three times.
Those two occasionally conflict. When they do, the layering wins, because a design stitched out of order looks wrong and no amount of saved time fixes that. What good sequencing avoids is the third case: a design that wanders back and forth across the frame picking up colors it already used, which is one of the marks of a traced file rather than a built one, as our post on hand digitizing vs auto digitizing explains.
Common request, and it catches people out.
A client orders the same badge on white, navy and red shirts. It sounds like one file used three times. In practice the thread colors often have to change, because a design that reads beautifully on white can disappear on navy, and the outline that separated two elements on a pale garment stops doing anything on a dark one.
The tidy way to handle it is to agree a colorway per garment color up front, with thread numbers written down for each. It's a short conversation at quoting and it prevents someone making a judgement call at the machine on a Friday afternoon.
The one combination worth calling out separately.
Light thread over a dark garment needs more underneath it than most people expect, because anything the top stitches don't cover reads as dark. That's an underlay decision rather than a color one, but it arrives disguised as a color problem, since the complaint is always that the white looks gray. There's more on that in stitch types for different fabrics.
Worth repeating because it costs nothing and saves an argument.
The most common stitch file, DST, carries no color information at all. It stores stops, not shades, so whoever runs the file decides what goes on the machine. That's why the same design comes out differently in two workshops, and it's covered in our guide to embroidery file formats.
So keep the thread numbers with the design, per colorway, alongside the client and the sizes. A year later, when they reorder, that list is the difference between matching the last batch and guessing at it. Keeping it with the order rather than in a notebook is exactly what EMBBA is for.
Color decisions sit right on the line between design and production, which is why they get made badly. Someone choosing purely on appearance produces a design that costs a fortune to run. Someone choosing purely on efficiency produces something that looks cheap.
Learning where that line is takes stitching designs out and watching what the choices cost you. Our Digitizing Mastery course teaches the production side alongside the software, and for designs you'd rather buy ready-made, EmbGig files come from digitizers who have made those calls already.
More than your machine has needles, for anything you'll run in quantity. Below that, the honest limit is whatever the design genuinely needs.
Barely. Colors cost stops and trims rather than stitches. What they do is add run time, which is the cost people forget to quote for.
Yes. Colors are assigned at the machine, so you can run any design in whatever thread you load. What you can't easily change is which parts of the design are separate colors.
Ideally yes. Different brands number their ranges differently and the same nominal color can sit slightly apart, which shows most on large areas of one shade. Where you have to mix, keep each color in the design to one brand rather than splitting a single shade across two.
Usually because the file carries no color information and each operator chose their own. Send the thread numbers with the file and it stops happening.
Every color costs a stop, a trim and a slice of run time, and almost no stitches. Keep the count at or under your needle count, merge shades that thread can't tell apart, let the garment stand in where it can, and write the thread numbers down so the next batch matches this one.
The Academy turns articles like this into proper courses, with video lessons, assessments, and people to learn alongside.